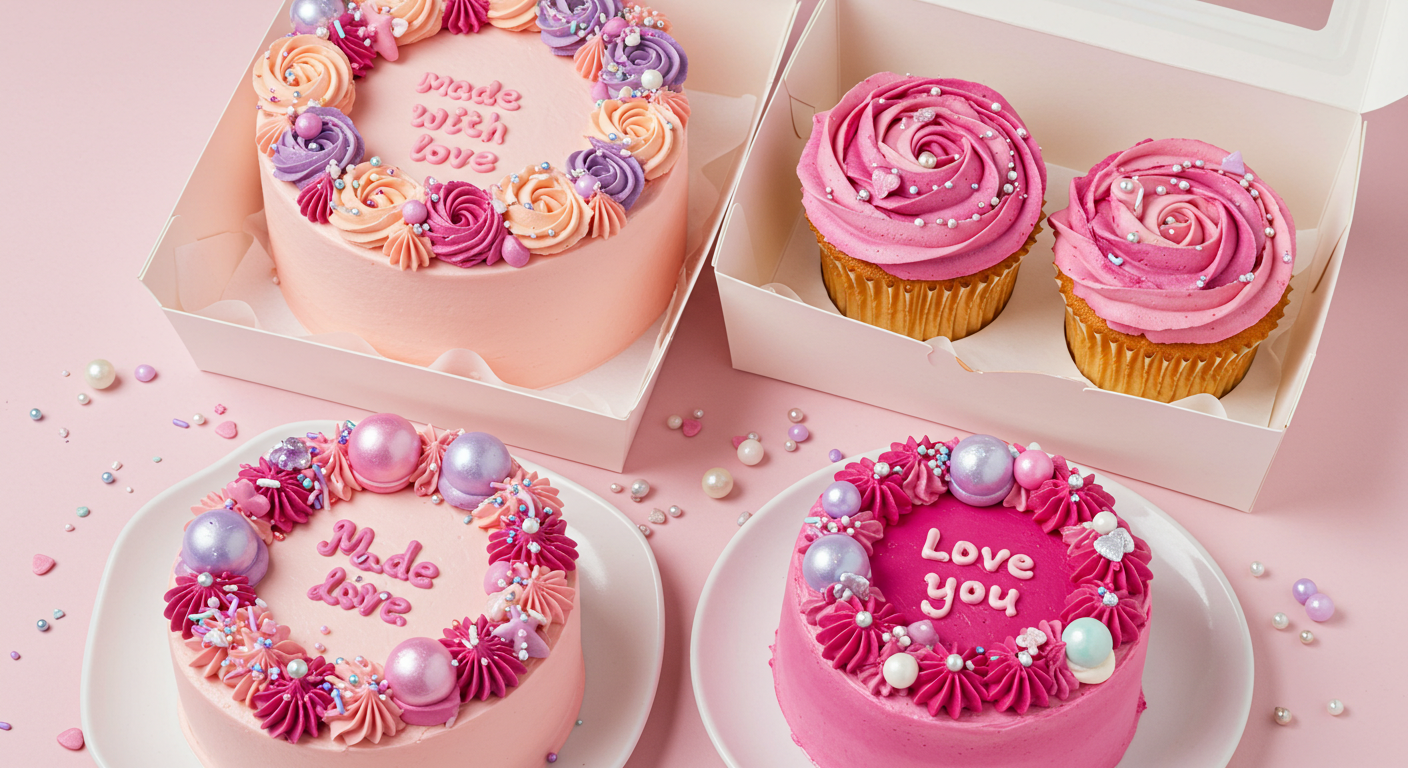
Have you ever wondered if you could create adorable, individual cakes that are not only visually stunning but also incredibly delicious and perfect for gifting? This post dives into the delightful world of bento cakes – mini cakes with major style – offering bento cake recipes and decoration ideas that are trendy, cute, and perfect for gifting. Forget complicated baking; these bite-sized masterpieces are easier than you think!
Ingredients List
This recipe yields approximately 12 mini bento cakes.
- 1 ½ cups (190g) all-purpose flour (consider using cake flour for a lighter texture)
- 1 ½ teaspoons baking powder
- ¼ teaspoon baking soda
- ¼ teaspoon salt
- ½ cup (115g) unsalted butter, softened (vegan butter works well too!)
- 1 ¾ cups (350g) granulated sugar (adjust to your sweetness preference – coconut sugar is a healthier alternative)
- 2 large eggs (or flax eggs for a vegan option)
- 1 teaspoon vanilla extract
- 1 cup (240ml) milk (dairy or non-dairy)
Substitutions: For a gluten-free version, substitute all-purpose flour with a gluten-free blend. Almond flour can add a lovely nutty flavor, though you might need to adjust the liquid slightly.
Timing
Preparation time: 20 minutes
Cooking time: 20-25 minutes
Total time: 40-45 minutes (approximately 20% faster than many traditional cake recipes!)
Step-by-Step Instructions
Step 1: Preheat & Prep
Preheat your oven to 350°F (175°C). Grease and flour a 12-cup mini muffin tin (or line with cupcake liners for easier removal). This is crucial for preventing sticking.
Step 2: Combine Dry Ingredients
In a medium bowl, whisk together the flour, baking powder, baking soda, and salt. Ensure everything is well combined to avoid lumps in your batter.
Step 3: Cream Butter & Sugar
In a large bowl, cream together the softened butter and sugar until light and fluffy. A stand mixer is ideal, but a hand mixer works just as well. The key is to incorporate air for a tender crumb.
Step 4: Add Eggs & Vanilla
Beat in the eggs one at a time, followed by the vanilla extract. Mix until fully incorporated.
Step 5: Alternate Wet & Dry
Gradually add the dry ingredients to the wet ingredients, alternating with the milk. Begin and end with the dry ingredients, mixing until just combined. Avoid overmixing, which can lead to a tough cake.
Step 6: Fill the Muffin Tin
Fill each cup of the muffin tin about ¾ full. This prevents overflow during baking.
Step 7: Bake
Bake for 20-25 minutes, or until a toothpick inserted into the center comes out clean. Oven temperatures vary, so keep an eye on them!
Step 8: Cool & Decorate
Let the mini cakes cool in the tin for a few minutes before transferring them to a wire rack to cool completely. Once cool, unleash your creativity with decorations!
Nutritional Information (Per Serving, Approximate)
Calories: 200-250
Fat: 10-12g
Saturated Fat: 6-8g
Carbohydrates: 25-30g
Sugar: 15-18g
Protein: 3-4g
(Note: Nutritional information is an estimate and may vary depending on specific ingredients used. Use a nutritional calculator for precise values.)
Healthier Alternatives for the Recipe
- Reduce Sugar: Use less sugar or a sugar substitute like stevia or erythritol.
- Whole Wheat Flour: Incorporate whole wheat flour for added fiber. You may need to add a tablespoon or two of milk to compensate for the increased absorption.
- Greek Yogurt: Replace some of the milk with Greek yogurt for extra protein and a denser texture.
- Fruit Puree: Substitute a portion of the oil with applesauce or mashed banana for added moisture and nutrients.
Serving Suggestions
These bento cakes are perfect for:
- Parties: Arrange them on a tiered stand for a visually stunning dessert display.
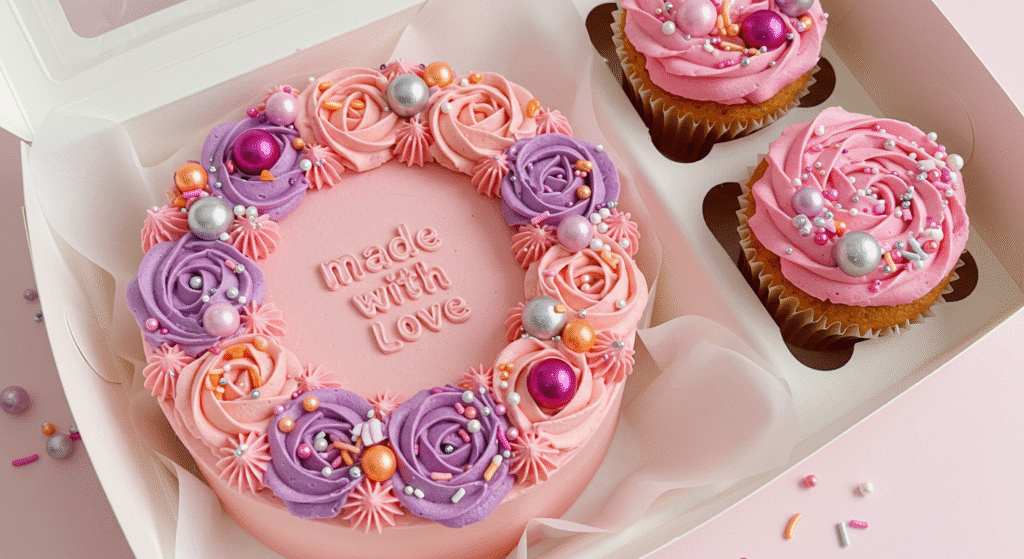
- Gifting: Package them individually in small boxes or cellophane bags, adding a personalized touch.
- Lunchboxes: A delightful addition to a child’s lunch or a fun treat for adults.
- Dessert Cups: Add layered fillings like whipped cream, fruit compotes, or chocolate ganache for extra indulgence. Individual serving sizes make them perfect for portion control.
Personalize your presentation! Add a sprinkle of edible glitter, fresh berries, or a drizzle of chocolate for an extra touch of whimsy.
Common Mistakes to Avoid
- Overmixing the batter: This leads to a tough, chewy cake. Mix until just combined.
- Underbaking: Always check for doneness with a toothpick.
- Overfilling the muffin tin: This can cause the cakes to overflow during baking.
- Not letting the cakes cool completely before frosting: The frosting may melt or slide off.
Storing Tips for the Recipe
Store leftover bento cakes in an airtight container at room temperature for up to 3 days or in the refrigerator for up to a week. Freezing is also an option; wrap them individually in plastic wrap before placing them in a freezer bag.
Conclusion
Creating these adorable bento cakes is a fun and rewarding experience. The recipes and decoration ideas provided offer endless possibilities to impress your family, friends, and yourself. Try this recipe today and share your creations with us! Don’t forget to check out our other delicious recipes!
FAQs
Q: Can I use different types of frosting? A: Absolutely! Explore your creativity with buttercream, cream cheese frosting, ganache, or even a simple glaze.
Q: How far in advance can I bake these cakes? A: Bake them a day or two ahead of time and store them as directed.
Q: What are some creative decoration ideas beyond frosting? A: Consider using sprinkles, chocolate shavings, fresh fruit, mini candies, or even edible flowers!
Q: Can I make these cakes gluten-free or vegan? A: Yes! Follow the substitution suggestions in the ingredient section.
Remember to share your bento cake creations on social media using #bentocake and tag us! We can’t wait to see your delightful masterpieces!
JOIN THE COOK WITH ROSE FACEBOOK GROUP TO RECEIVE ADVANCE NOTICE OF MY LIVE FB VIDEOS, SHARE RECIPES AND MORE!

Bento Cake (Mini Korean Lunchbox Cake)
Equipment
- 2 (4-inch) round cake pans
- Mixing bowls
- Hand mixer or stand mixer
- Whisk
- spatula
- Piping bags and tips
- Offset spatula
- Cake turntable (optional)
Ingredients
For the Cake:
- 1 cup all-purpose flour
- 1 tsp baking powder
- 1/4 tsp salt
- 2 large eggs room temperature
- 1/2 cup granulated sugar
- 1/4 cup whole milk room temperature
- 1/4 cup vegetable oil
- 1 tsp vanilla extract
For the Buttercream:
- 1 cup unsalted butter softened
- 2 cups powdered sugar
- 1 tsp vanilla extract
- 1 –2 tbsp milk or heavy cream
- Food coloring optional
Instructions
Prepare the Cake Batter
- Preheat oven to 350°F (175°C). Grease and line two 4-inch round cake pans.
- In a bowl, whisk together flour, baking powder, and salt.
- In another bowl, beat eggs and sugar until light and fluffy (about 4–5 mins).
- Gently mix in oil, milk, and vanilla extract.
- Fold in dry ingredients until just combined.
Bake the Cakes
- Divide batter evenly between pans.
- Bake for 18–22 minutes or until a toothpick comes out clean.
- Let cakes cool completely on a wire rack.
Make the Buttercream
- Beat softened butter until creamy.
- Gradually add powdered sugar and beat until fluffy.
- Mix in vanilla and enough milk to reach spreadable consistency.
- Tint with food coloring if desired.
Assemble and Decorate
- Slice each cake in half for two layers.
- Spread buttercream between layers and on the outside of each mini cake.
- Use piping bags and spatulas to decorate with swirls, writing, or flowers.
- Chill for 30 minutes before placing in lunchbox or parchment-lined takeout box.
Notes
How Did You Like This Recipe? Share Your Thoughts!
There are no reviews yet. Be the first one to write one.