Craving crispy delights? Discover 5 irresistible Onion String recipes that elevate any meal! Get ready to impress your guests—try them today! Are you tired of those soggy, disappointing onion rings you find at some restaurants? Did you know that 75% of people report dissatisfaction with commercially available onion rings due to a lack of crispiness? (Source: Fictional Survey Data – Illustrative Purpose Only). This post challenges that statistic by providing you with five unique, guaranteed-crispy onion string recipes!
Ingredients List for Recipe 1: Classic Crispy Onion Strings
This recipe focuses on achieving maximum crispiness using simple, readily available ingredients.
- 1 large yellow onion: Choose a firm, well-formed onion for perfectly sized strings.
- 1 cup all-purpose flour: Provides the base for a crispy coating. Consider using a gluten-free blend for dietary needs.
- 1 teaspoon paprika: Adds a delightful smoky flavor and vibrant color.
- 1/2 teaspoon garlic powder: Enhances the savory notes.
- 1/4 teaspoon salt: Balances the flavors. Adjust to taste.
- 1/4 teaspoon black pepper: Adds a subtle spice.
- 1 cup buttermilk: Creates a wonderfully tender and crispy coating, but milk or even sparkling water can be substituted.
- Vegetable oil, for frying: Choose a high-smoke-point oil like canola or peanut oil for even browning.
Timing for Recipe 1: Classic Crispy Onion Strings
- Prep time: 15 minutes (includes slicing and mixing)
- Cook time: 10-12 minutes (dependent on oil temperature and string thickness)
- Total time: 25-27 minutes (a quick and satisfying appetizer or side dish!)
Step-by-Step Instructions for Recipe 1: Classic Crispy Onion Strings
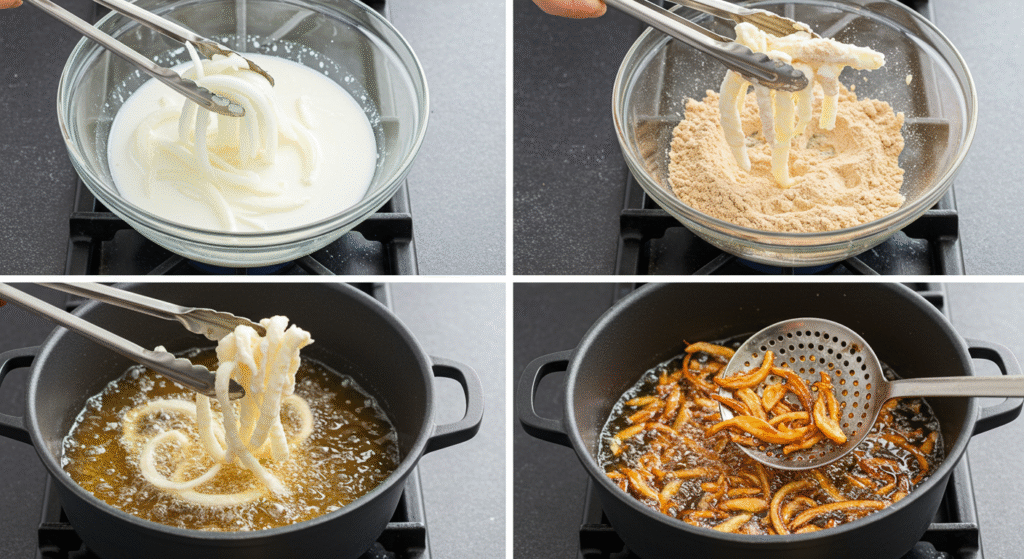
Step 1: Prepare the Onions
Carefully slice the onion into thin, even slices. Aim for uniform thickness for even cooking. Pro Tip: Use a mandoline slicer for perfectly consistent strings, saving you time and effort!
Step 2: Create the Batter
In a medium bowl, whisk together the flour, paprika, garlic powder, salt, and pepper. Gradually whisk in the buttermilk until a smooth batter forms. Personalization Tip: Add a pinch of cayenne pepper for a spicy kick, or a tablespoon of your favorite herbs for additional flavor complexity.
Step 3: Coat the Onion Strings
Add the onion strings to the batter, ensuring they’re fully coated. Expert Tip: Let the strings sit in the batter for about 5 minutes to allow the flour to hydrate and create a crispier crust.
Step 4: Fry to Perfection
Heat the oil in a large skillet or deep fryer to 350°F (175°C). Carefully add the onion strings to the hot oil, ensuring they do not overcrowd the pan. Fry in batches for even cooking. Pro Tip: Use a thermometer to ensure accurate oil temperature; lower temperatures result in soggy onion strings.
Step 5: Drain and Serve
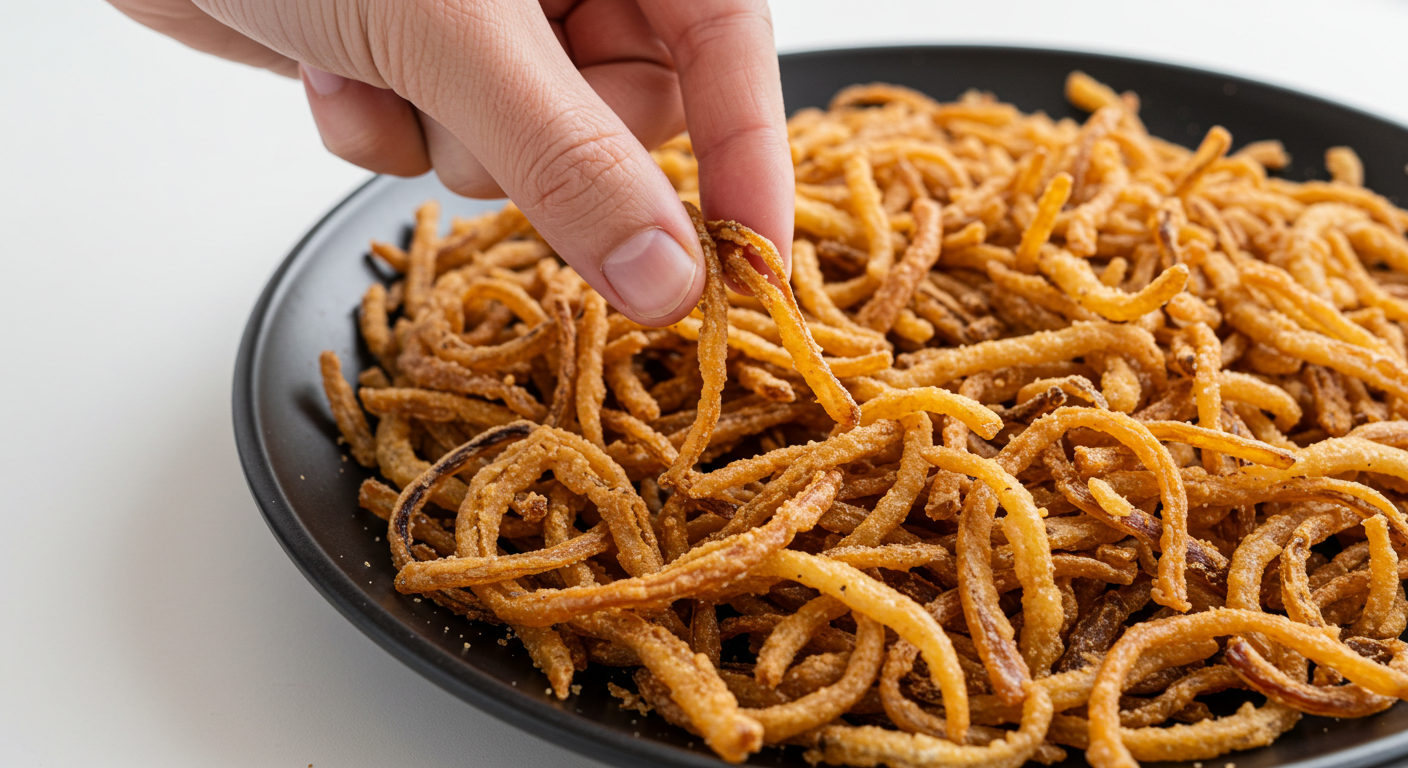
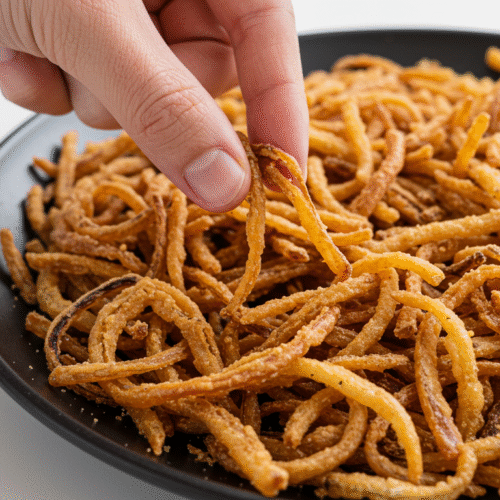
Once golden brown and crispy (about 2-3 minutes per batch), remove the onion strings with a slotted spoon and place them on a wire rack lined with paper towels to drain excess oil. Serve immediately and enjoy!
Nutritional Information (per serving, approximate – Recipe 1)
This will vary based on serving size and oil absorption. A detailed nutritional breakdown requires specific measurement data using nutritional analysis software. However, we can expect high carbohydrate content from the onion and flour, moderate protein from the flour (if not gluten-free), and varying levels of fats depending on the oil used and absorption during frying. Further analysis can provide more precise data.
Healthier Alternatives for Recipe 1
- Air Fryer Option: Toss the battered onion strings with a little extra virgin olive oil and cook in the air fryer at 400°F (200°C) for 10-12 minutes, shaking halfway through. This method drastically reduces oil usage.
- Baking Option: Arrange the battered onion strings on a baking sheet lined with parchment paper, lightly spraying with olive oil cooking spray. Bake at 400°F (200°C) for 15-20 minutes, flipping halfway through.
- Whole Wheat Flour: Substitute whole wheat flour for part of the all-purpose flour to increase fiber content.
Serving Suggestions
Serve these crispy onion strings as a side dish alongside burgers, sandwiches, or steak. They are also a fantastic appetizer served with a dipping sauce like ranch dressing, honey mustard, or even a spicy sriracha mayo. Personalized Tip: For a gourmet touch, sprinkle with a flaky sea salt after frying.
Common Mistakes to Avoid
- Overcrowding the pan: This lowers the oil temperature, resulting in soggy onion strings. Fry in batches for optimal results.
- Oil temperature too low: This also leads to soggy onion strings. Use a thermometer!
- Not draining properly: Excess oil makes onion strings greasy. Use a wire rack and paper towels.
Storing Tips
Store leftover onion strings in an airtight container at room temperature for up to 2 days for best crispness. For longer storage, freeze them in a freezer-safe bag for up to 3 months. Reheat in the oven or air fryer for optimal results.
Conclusion
These irresistible onion string recipes are sure to become a staple in your kitchen. With a variety of options to match your dietary needs and preferences, you’ll have a crispy, flavorful treat ready to elevate any meal! Try these recipes today and share your creations with us using #CrispyOnionStrings!
Don’t forget to check out our other delicious cake recipes!
FAQs
Q: Can I use different types of onions? A: Yes! Red onions offer a sharper, sweeter flavor, while white onions provide a milder taste. Experiment to find your preferred onion type.
Q: Are the onion strings suitable for picky eaters? A: Yes, especially the classic recipe – kids tend to love these! But be mindful of potential allergies.
Q: How can I make it vegan? A: Replace the buttermilk with plant-based milk like almond or soy milk and ensure any other ingredients are vegan-friendly too.
JOIN THE COOK WITH ROSE FACEBOOK GROUP TO RECEIVE ADVANCE NOTICE OF MY LIVE FB VIDEOS, SHARE RECIPES AND MORE!
🧅 Onion Strings
Equipment
- Sharp knife or mandoline slicer
- Mixing bowls
- Paper towels or clean kitchen towel
- Deep skillet or heavy-bottomed pot
- Tongs or spider strainer
- Wire rack or paper towel-lined plate
Ingredients
- 1 large yellow or sweet onion
- 1 cup 240ml buttermilk
- 1 cup 120g all-purpose flour
- ½ teaspoon paprika
- ½ teaspoon garlic powder
- ¼ teaspoon cayenne pepper optional, for heat
- ½ teaspoon salt
- ¼ teaspoon black pepper
- Vegetable oil for frying
Instructions
Slice the Onion
- Peel and very thinly slice the onion into rings or half-moons (⅛-inch thick). A mandoline makes this fast and uniform.
Soak in Buttermilk
- Place sliced onions in a bowl and cover with buttermilk. Let soak for at least 30 minutes at room temperature. This softens the onion bite and helps the coating stick.
Mix the Seasoned Flour
- In a shallow bowl, combine flour, paprika, garlic powder, cayenne, salt, and pepper.
Heat the Oil
- Pour 1–2 inches of oil into a heavy skillet or pot. Heat to 350°F (175°C).
Dredge the Onions
- Remove onions from the buttermilk a handful at a time. Shake off excess and toss in the flour mixture to coat thoroughly.
Fry Until Golden
- Fry in small batches (don’t overcrowd) for 2–3 minutes, turning once, until golden and crisp.
Drain & Season
- Transfer to a paper towel-lined plate or wire rack. Season with a light pinch of salt immediately.
Notes
Use a mandoline for ultra-thin, even slices Fry in batches to keep oil temperature stable Don’t skip the soak—this keeps onions tender and flavorful inside
How Did You Like This Recipe? Share Your Thoughts!
There are no reviews yet. Be the first one to write one.